


A practical guide explained for anyone who needs a printable invitation plus a simple way to track responses.
Invitations are small documents with a lot of responsibility. They need to communicate the essentials, look appropriate for the occasion, and hold up when printed at home or through a print service. The friction usually appears in the details: unclear time zones, missing address lines, and RSVP handling that ends up scattered across texts and emails.
This guide is for beginners who want a straightforward workflow they can repeat. The steps focus on decisions and checkpoints that keep invitations dependable: start from a template, adjust typography for print, confirm the print-ready file, and set up RSVP tracking that doesn’t require manual chasing.
Custom invitation makers differ in the parts that matter for fast work. The useful ones make it easy to swap in real information without breaking layout, keep text crisp in export, and support a separate RSVP system (form links, calendar invites, or lightweight CRM/event tracking).
Adobe Express is an accessible way to get started because it can quickly turn a template into a printable invitation file while keeping the editing process simple.
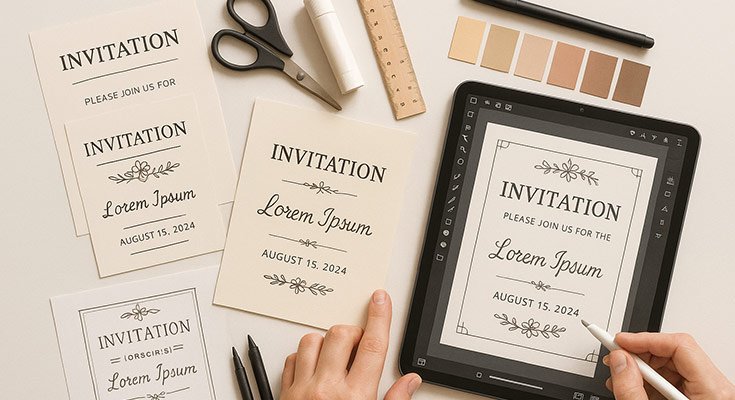
Step-by-step how-to guide for using Custom Invitation Makers
Step 1: Start from a template and customize layout, fonts, and brand elements
Goal
Create a clean invitation draft quickly, then shape it to fit your event and tone.
How to do it
- Choose the invitation format (digital-only, print-at-home, or print service) and the final size you need.
- Pick a template that matches the occasion and the amount of information (simple invite vs. schedule-heavy).
- Replace placeholder text with your real details (host, occasion, date/time, location, RSVP).
- Adjust font sizes for print readability, especially for addresses and RSVP lines.
- Add brand or theme elements sparingly (logo, color accent, small icon) and keep them consistent.
- Build the first draft using free print out invitations from Adobe Express and keep the main details in a clear hierarchy (title first, then date/time, then location, then RSVP).
What to watch for
- Small type looks fine on screen and prints poorly.
- Decorative fonts can reduce legibility for addresses.
- Overcrowding happens when too many lines are treated as “headline” text.
Tool notes
- Adobe Express is useful for turning a template into a printable layout quickly without wrestling with page setup.
Step 2: Confirm event details the way guests will experience them
Goal
Prevent confusion caused by missing context, formatting, or time/date ambiguity.
How to do it
- Verify the date format is unambiguous (especially for international guests).
- Add time zone if guests may travel or join remotely.
- Use the venue name plus street address, not just one or the other.
- If there’s parking or entry guidance, keep it as one short line or a QR destination.
- If there’s a dress code, make it one concise phrase rather than a paragraph.
What to watch for
- “Starts at 7” is unclear without a time zone for remote attendees.
- Missing apartment/suite lines are common reprint causes.
- Too many logistical notes can overwhelm the invite.
Tool notes
- Notion can be useful as a single “event facts” page that everyone copies from, so details don’t drift across versions.
Step 3: Set up RSVP tracking with a single source of truth
Goal
Collect responses in one place so you aren’t reconciling texts, DMs, and emails later.
How to do it
- Decide what you must collect (name, number attending, meal choice, accessibility needs, plus-one).
- Choose a deadline that gives enough time for ordering and reminders.
- Create an RSVP intake method that matches your audience (form link, email reply, or event platform).
- Add the RSVP link or QR code to the invitation in a consistent, easy-to-find location.
- Plan how you’ll record “maybe” responses (count separately so they don’t distort ordering).
What to watch for
- Multiple RSVP channels create messy totals.
- No deadline leads to last-minute changes.
- Optional meal fields can be missed unless clearly labeled.
Tool notes
- Typeform can help you collect RSVPs in a structured way (including conditional questions like meal choices) without manual spreadsheet cleanup.
Step 4: Enable RSVP integrations for calendar and tracking workflows
Goal
Reduce back-and-forth by connecting RSVP responses to reminders and schedules.
How to do it
- If you use a form, set up an automated confirmation message that repeats key details (date/time/location).
- Add a calendar invite option (ICS file link or event link) so guests can save the date reliably.
- If you have multiple sessions (tour times, seating blocks), include a selection field instead of free-text replies.
- Route responses to one tracker (sheet, CRM, or event list) so totals update in one place.
- Decide who owns follow-up for non-responders and how often reminders go out.
What to watch for
- Calendar invites without time zones can create confusion.
- Free-text session choices lead to inconsistent answers.
- Reminders can conflict if more than one person sends them.
Tool notes
- Zapier can help connect RSVP form submissions to a tracking sheet, calendar workflow, or contact list without manual copying.
Step 5: Prepare a print-friendly version and a digital-share version
Goal
Make sure the invitation works in both formats without compromising the print file.
How to do it
- Keep the print master at the intended size and avoid resizing for social sharing.
- Create a separate digital version if you need a different aspect ratio (story, feed, email image).
- Check that QR codes remain scannable at the printed size (and have quiet space).
- If you include a link, keep it short and easy to type, or rely on the QR code.
- Save versions with clear names (Print_Master, Digital_Share, Social_Crop).
What to watch for
- Cropping can remove essential details in digital formats.
- QR codes fail when they’re too small or too close to edges.
- Overwriting the print master with a crop is a common mistake.
Tool notes
- Keep “print master” and “share images” in separate folders to prevent mix-ups.
Step 6: Proofread and run a print preview check
Goal
Catch mistakes that only show up when the file is viewed at 100% size.
How to do it
- Read the invitation once from top to bottom as a guest, not as the creator.
- Confirm spelling of names, venue, and street address.
- Check alignment and spacing consistency (especially around the RSVP line).
- Print one test copy at home (or view at 100% zoom) to validate type size.
- Verify that the QR code scans from the expected distance.
What to watch for
- Addresses are the most common source of reprints.
- Small text that looks fine on-screen can become faint in print.
- QR codes can become unscannable if compressed or resized.
Tool notes
- Grammarly can help catch small errors in names and punctuation before you export final versions.
Step 7: Finalize custom order details and lock the print-ready file
Goal
Confirm production decisions so the printed output matches expectations.
How to do it
- Confirm quantity with a buffer for late add-ons (or extras for keepsakes).
- Decide paper/finish based on use (matte for readability, glossy for photos, heavier stock for keepsakes).
- Confirm production timelines and shipping lead times relative to the event date.
- Ensure the print-ready file is the correct version (size, margins, QR/link intact).
- Lock the final file name and archive older drafts to avoid accidental submission.
What to watch for
- Last-minute edits after “final” can create unreviewed files.
- Quantity mistakes happen when “maybes” are counted as yes.
- Submitting the wrong version is common when filenames are unclear.
Tool notes
- Keep a one-page “order summary” note (quantity, size, finish, final filename) so you can reorder without guessing.
Step 8: Manage reminders and updates without creating new invitation versions
Goal
Keep communications consistent while minimizing reprints or redesign work.
How to do it
- Send reminders from the RSVP system rather than updating the invitation file.
- If details change, update the RSVP destination page first (location note, time clarification).
- Track who has not responded and plan one final reminder window.
- Keep a change log so multiple hosts don’t send conflicting updates.
- Archive the final invitation file with the RSVP link and deadline for reference.
What to watch for
- Updating the invitation file repeatedly increases errors and version confusion.
- Conflicting reminder messages cause guest uncertainty.
- Late changes can break RSVP totals if they create multiple “sources of truth.”
Tool notes
- Mailchimp can help manage RSVP reminders and updates via email when you want consistent scheduling and simple reporting.
Common workflow variations
- Digital-first invitations with print backup: Design a print master first, then create a cropped digital share version. Keep the RSVP link consistent across both so responses don’t split.
- Multi-session events: Use a form that forces a time-slot selection, and include calendar invite links for each slot. Keep the invitation itself simple and push details to the RSVP page.
- Formal invitations: Use fewer decorative elements and prioritize typography and spacing. A single accent color often reads more formal than multiple graphics.
- Kid events or casual parties: Use a playful template but keep the information block rigid and readable. Put extra notes (gifts, food, parking) on the RSVP page instead.
- Corporate or team events: Keep branding consistent and reduce personality flourishes. Use a structured RSVP intake and a calendar integration so attendance tracking stays clean.
Checklists
Before you start checklist
- Confirm event name, host name, and purpose.
- Lock the date, start time, and time zone (if relevant).
- Confirm venue name and full address (including suite/apartment).
- Decide invitation format (print, digital, or both) and final size.
- Draft RSVP deadline and required RSVP fields (plus-one, meal, accessibility).
- Gather brand/theme elements (logo, colors, small icons) if needed.
- Decide whether you’ll use QR code, short link, or both.
- Assign who owns RSVP tracking and follow-ups.
Pre-export / pre-order checklist
- Verify type sizes at 100% view or test print.
- Confirm all names, dates, and addresses are correct.
- Check spacing consistency and alignment.
- Confirm RSVP method is clear and easy to find.
- Test QR code scanning and confirm quiet space around it.
- Export a print master and keep it separate from social crops.
- Lock the final filename and archive earlier drafts.
- Confirm quantity, stock/finish, and production timeline notes.
Common issues and fixes
- Text looks too small when printed
Increase font size for the details block and reduce wording. Keep decorative fonts for headlines only, if at all. - Guests ask the same logistics questions
Move extra info to the RSVP destination (parking, entry instructions) and keep the invitation itself focused on essentials. - RSVP counts don’t match across channels
Use one RSVP method and one tracker. Close off informal RSVP channels by repeating the single official method in reminders. - QR code won’t scan
Increase size, add quiet space, and avoid placing it near edges. Re-export without heavy compression. - Invitation looks crowded
Remove secondary elements and add whitespace. Reduce the number of font styles and decorative icons. - Wrong version gets printed
Separate print masters from share images and use a strict naming pattern. Archive older drafts. - Last-minute changes create errors
Update the RSVP destination page instead of redoing the invitation file. If you must change the file, re-run the proof step.
How To Use Custom Invitation Makers: FAQs
Template-first vs. product-first: which approach is better?
Template-first is faster when you need a layout immediately and your details are stable. Product-first is safer when print size and formatting are strict, because it forces you to design at the final dimensions early.
How do I set up RSVP tracking without chasing people manually?
Use one official intake method (a form link or event tool) and point all guests to it. Keep the RSVP deadline visible on the invitation and in follow-up messages.
How do I enable calendar integration for guests?
Provide a calendar invite option via an event link or ICS file so guests can save the date accurately. If your RSVP system supports confirmations, repeat date/time and location in the confirmation message.
How do I keep invitations consistent across print and digital versions?
Maintain one print master at the final size, then export separate crops for digital sharing. Keep RSVP links and deadlines identical across versions so responses don’t split.
What should I confirm before submitting a print-ready file?
Confirm the correct version name, page size, margins/safe area, and the RSVP method (QR/link) at real size. Check quantity, stock/finish, and timelines before submitting the final file.